Image

TN Slideshow

TN Slideshow

I made this lovely TN slideshow on photoshop. I first found 5 photos of Tennessee and saved them to my desktop. I then dragged one of the photos into photoshop and placed the rest (make sure to press enter after placing each photo). I then rasterized all of the layers and unlocked the background layer. I then made a type layer and put it on top of all the other layers. I then went to window and opened timeline. I made sure it said create animation frames and then clicked it. After the first slide was created I clicked on the little page icon that creates a duplicate slide and then hid the previous image. I did this until i had all five slides done. I then changed the amount of seconds each image showed for by clicking the little drop down under each image. I also clicked on the drop down that said “once” and changed it to “forever” so it would continuously play. I then saved it by saving it to web as a GIF. Badda-bing. Badda-boom. Done.

Image

Content Aware Scale

Content Aware Scale

This photo shows different ways to scale a photo in Adobe Photoshop. The top right is done by simply using free transform which is the worst option because the photo because distorted. The second photo on the left is done by using the content aware tool by going to the Edit drop down menu. This will change the background and works well with similar background colors. The last image on the left was done by selecting the flower and saving the selection. You then go to Edit>Content Aware Scale tool and at the top you will see a drop down menu that says protect next to it. Your selection should be in there so you select it and then stretch the image. This way will stretch the background but keep the selected image protected. It’s the best way!

Image

Content Aware

Content Aware

For this image, I moved the left sheep from the right side of the page using the content aware tool. Start by selecting the content aware tool under the band-aid tool. You then trace around the object leaving a quarter of an inch margin. Once it has been traced you move it to its new location and photoshop will make up content for where the sheep was and blend the sheep in to its new environment. It works best with similar colors like with fish in the sea, birds in the sky, or even a mole on a face.

Image

Puppet Warp

Puppet Warp

I helped this guy look extra stretchy by using the puppet tool in Adobe Illustrator. First, you want to make sure the image you are warping is on a separate layer. You then make the image a smart object by option+clicking the layer and selecting create smart object. You then go to the puppet warp tool under Edit. You can turn the grid on and off at the top of the page. You then place points on the parts you want to stretch and you have to put atleast two points for it to work. So for this image I put points on his hands, feet, head, and left knee and right elbow. To get out of the puppet warp tool you click on another tool and then press apply puppet warp.

Image

Liquify

Liquify

I edited this poor girls face in Adobe Photoshop using the liquify tool. With the liquify tool, I was able to make certain parts bigger with the bloat option, move things around with the forward warp tool, make things smaller by using the pucker tool, and twist things using the twirl clockwise tool. When using the tools you have to make sure to put the center of the circle over what you want to change.

Image

earth.jpg

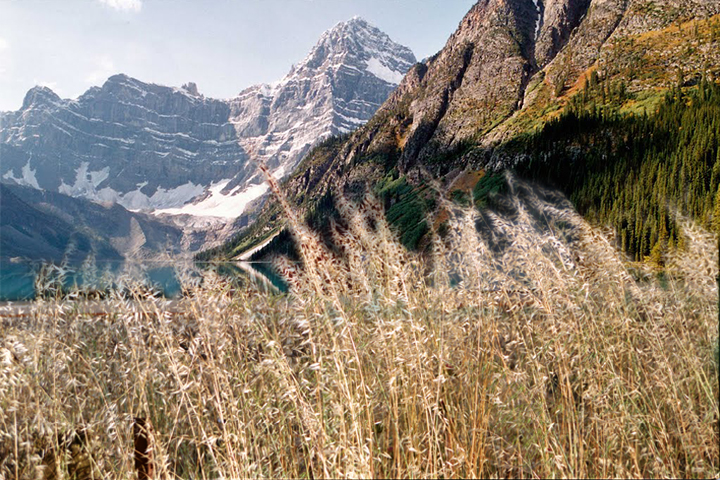
I created this type treatment using Adobe Photoshop. The photos were retrieved from the tutorial I followed. First, I created a new document with a green background that had a radial gradient on it which made the background go from a light yellow-green in the top left corner to a mid-range green on the outside. I then took the background image, which was a brown paper bag, and set it to overlay and changed the opacity to 70%. I then created a new layer and used a large, soft, black brush to add some black to the edges. I also set the opacity back to about 30% and set it to overlay. I then took the image of the grass and copied on to the canvas. I then chose a simple sans serif typeface to type out the word EARTH that would work well with the grass. I started by setting the text in white and set it to an overlay with the opacity at 50%. While on the text layer, I selected all the type and then selected the grass layer so I could add on some stray pieces of grass along the outside. This way the grass would look more realistic and not as cut out. I did this by using the quick mask. Once I finished the selection, I saved it incase I needed to select it again. I then duplicated the grass layer and then inverted the selection and deleted the top layer of grass on the outside. I then added a bevel to the type as well as a screen. I then duplicated that layer and added a drop shadow and beveled it. I then merged the two layers. Then to create the shadow, I selected the grass layer, duplicated it, filled it with black, and moved the black layer down once and over 8 times. Then, I added a motion blur with a 45′ andgle and a distance of about 30. The text was then set to 50% opacity. I then moved the shadow layer down and to the right and duplicated the layer 3 times and erased a bit of it each time so it was darker the closer it got to the text. These layers were set to multiply. At the end, I added some light to the image by adding a gradient of white to transparent towards the top left on a new layer. This layer was then set to soft light at 50%. Finally, I found an image of a snail and butterfly, selected them, and placed them on the letters. Voila.

Image

Retouching

Retouching

I starting by dragging the original photo into Adobe Photoshop. I created a new layer by pressing Command+J and then selected the clone stamp tool. I changed the brush to be 10 pixels and then option clicked the gray background about and inch away from the white line. I then painted over the white line while watching the plus sign (part of the clone stamp tool) to make sure it was staying in the gray area. I then used to the healing brush tool (the one that looks like a band-aid) and changed the hardness to 80 and the size to 10. I then drew over the harsh lines around the mans mouth and chin. I then selected the healing brush and once again changed the hardness to 80 and drew over the wrinkles on the mans forehead. Next, I selected the patch tool (under the healing brush) and drew around the “bad skin” under the mans eyes. I then took that area and dragged down to the better skin. After that I selected the clone tool and selected the whispy hairs at the top and used the clone tool to fill in his bald spot. I didn’t particularly like the way it looked so I undid it.

For the baby, I started by correcting the red eye. I selected the red eye tool (under the spot healing brush) and dragged out a square big enough to get all the pixels around the eyes. I then went to levels above the layer panel and changed RGB to Red and dragged the mid-tones a little to the right to make the image less red.

Image

Prague

Prague

I edited this image using Adobe Photoshop. I started by dragging the original photo into photoshop and creating a duplicate layer by pressing command+j. I then selected the sky using the magic wand at a tolerance of 50%. I then went to Select<Save Selection and named it sky so that I could select the same area later on if necessary. I then went back to layer 1 and went to Select<Load Selection<Sky. With the sky reselected I went to color balance above the layers panel and moved the levers closer to the cyan and blue to make the sky have a little more color. Next, I selected the water, while on layer 1, with the quick selection tool. I cranked up the brightness and contrast to make the water brighter and still see the reflections. I then went back to layer 1 and hid the background layer. I selected the eraser tool and erased some of the darker clouds with the eraser set at 200 pixels. The background was checkered so I went to PHotoshop<Preferences<Transparency & Gamut and changed the grid size to none. Voila.

Image

Fire and Glass

Fire and Glass

I created this image in Adobe Photoshop. I started by dragging the fire image in to photoshop and then placed the image of the sand in. The sand image came in as a smart object so I had to rasterize it. We then made a copy of the fire image and placed it on top of the sand to make a fire sandwich. I then changed the opacity of the top fire image so I could see the hourglass underneath it. I then selected the sand using the quick selection tool while on the top fire layer and deleted the selection. I did this for both chunks of sand so that you could see the fire through the glass but not on the sand.

Image

Weeds

Weeds

For this assignment we took an image of weeds and cut the weeds out from the background and placed them in the mountains. To do this, I started by selecting the bottom chunk of the weeds with the rectangular marquee tool and then selected the rest using the quick mask tool. When using the quick mask, I made the brush very little so I could make sure I was only drawing over the parts of the weeds that I wanted to be transferred to the other image. When I thought I had most of it selected I switched out of the quick mask mode and redefined the edge so it wasn’t so sharp. I also used the eraser on a low opacity on areas that were clearly wrong. I then inverted the selection and deleted the background. I then dragged that selection over to the image of the mountains and placed it at the bottom. I feathered the edges of the weeds a little and then I was done. The weeds were now at the mountains.